E39 Front Struts Write-up
The following information is provided for reference purposes only and should be used at your own risk
In no event shall Beisan Systems, LLC or its members be liable for incidental, consequential, or special loss or damages of any kind however caused.
Introduction
The E39 comes equipped with OEM Sachs struts/shocks, springs, and associated components. Sachs suggests the lifespan of their struts/shocks is 70k-120k miles. Sachs says cold weather and bad road conditions are the primary contributors to accelerated strut/shock deterioration. Sachs BMW struts and shocks are made in Germany. The Sachs parts BMW sells and the ones sold on the open market are identical, except for the part numbers. Sachs provides a lifetime (“defective or worn-out”) warranty on their struts/shocks. This is available through third party vendors, but not through BMW.
The following is a short discussion on front struts failure symptoms and diagnosis, and an E39 Sachs front struts R&R (remove and replace) procedure.
Symptoms
Initially, the front struts will squeak and have an extra bounce on speed bumps. Within a month this will transition to the car landing hard on speed bumps and the suspension feeling stiff on road bumps. A loss of control can also be felt during and after excessively bumpy road conditions.
Over time failing struts can cause inner tire tread cupping and wear.
Badly worn struts can leak lubricating oil.
If the spring pads are badly worn, a clunk could be heard when landing from a speed bump.
Diagnosis
There is no practical DIY diagnosis for struts/shocks. Paying attention to the symptoms is sufficient to characterizing the failure. If one end of the car is presenting with failure symptoms, then it’s likely the other end is not far behind.
Repair Procedure
The following is an E39 Sachs front struts R&R (remove and replace) procedure.
A wheel alignment should be performed after the repair.
Repair time ~8 hours.
Parts, Tools, and Shop Supplies
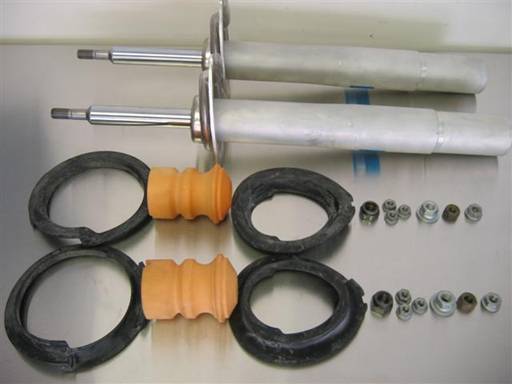
2 x Sachs struts $164.40/each, 2 x upper spring pad (6-cyl, 31-33-1-091-867; 8-cyl, 31-33-1 -091-233) $3.02/each, 2 x bump stop (varies by model/year/suspension) $12.08/each, 2 x lower spring pad (i6 < 10/99 & v8 < 9/99 31-33-1-091-864, i6 >=10/99 & v8 >= 9/99 31-33-1-096-664) $3.44/each, 2x strut self-locking nut (31-12-1-095-420) $0.50/each, 6 x strut tower (collar) self-locking nut (31-33-1-092-887) $0.40/each, 2 x wheel carrier self-locking nut (33-32-1-093-103) $1.80/each, 2 x tie-rod self-locking nut (32-21-1-094-586) $0.40/each, 2 x stabilizer bar link self-locking nut (at stabilizer bar) (31-35-1-095-452) $0.37/each
Note: The Sachs new strut came with a strut self-locking nut, but was size 22mm not 21mm as specified by BMW. The strut mount and BMW ST socket would not have worked with the 22mm nut.
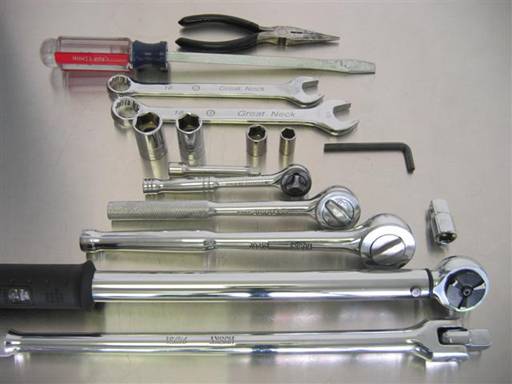
Needle nose pliers, large flathead screwdriver
16mm combo wrench, 18mm combo wrench
5mm Allen wrench
10 mm socket 1/4″, 13mm socket 1/4″, 16mm socket 1/2″, 18mm socket 1/2″
1/4″ ratchet w/ extension, 3/8″ ratchet, 1/2″ ratchet, 3/8″ torque wrench (24 Nm [17.5 ft-lb] – 110 Nm [81 ft-lb]) w/ 1/2″ converter, 1/2″ breaker bar (18″)
Optional: Long socket extension 1/2″ (not shown), for wheel carrier leverage.
Note: I utilized my 3/8″ torque wrench (17″) w/ 1/2″ converter instead of my 1/2″ torque wrench (22″) due to the functionally easier to use arm length. A 1/2″ torque wrench would also work well.
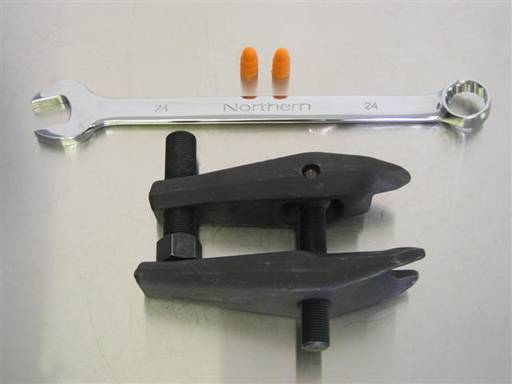
24mm combo wrench, BMW ST ball joint remover (90-88-6-31-2-240) $125/each
Optional: Ear plugs
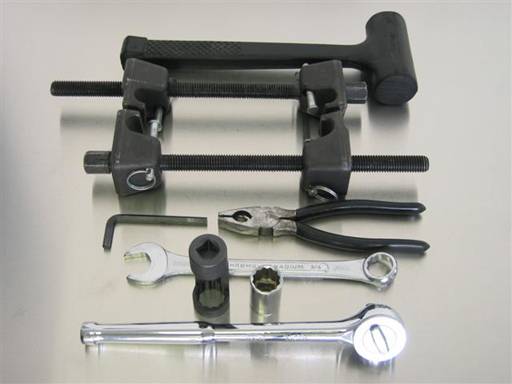
~1lb dead blow hammer
OEM (company name) strut spring compressor #27036 AutoZone free w/ ~$40 deposit
6mm Allen wrench, wide/full jaw pliers
3/4″ combo wrench, BMW ST strut nut socket 21mm (90-88-6-31-2-210) $33.20/each
3/4″ socket 1/2″, 1/2″ ratchet (listed above)
Note: 3/4″ size is specific to indicated spring compressor
Note: BMW ST strut nut socket can be substituted with 13/16″ (~21mm) sparkplug socket with hex base, and 13/16″ (~21mm) combo wrench.
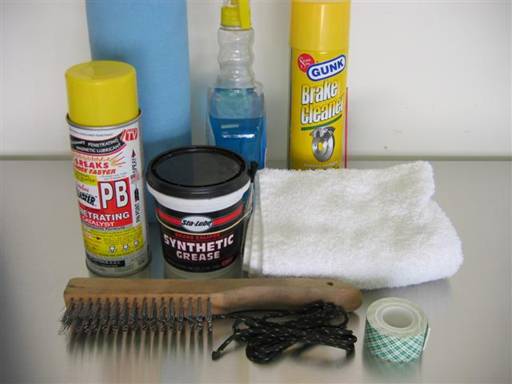
Paper towels, glass cleaner, brake cleaner
Spray lubricant, graphite based grease (Sta-Lube, Synthetic Grease, CRC), towel
Stainless steel wire brush, 2 x 2ft small gauge rope, 4″ x 1″ mounting tape
Not shown: floor pad (old quilt), 2 x wheel carrier stands (bucket & 2 wood blocks)
Optional: Paint (to mark spring position on strut)
Repair
Raise front of car and place on jack stands (follow appropriate procedure; chock both sides of both rear wheels). Remove front wheels. Remove engine splashguard.
The following procedure shows the left side (driver side). The right side is the same but with minor noted differences.
It’s more effective to perform the left side first since it’s illustrated with pictures.
Removal of spring/strut from car
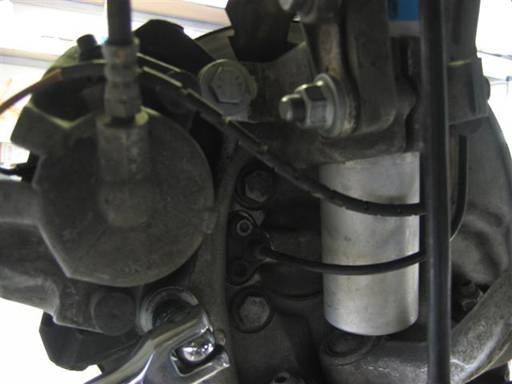
Remove Brake caliper carrier to wheel carrier 2 mounting bolts (18mm socket 1/2″ / 1/2″ breaker bar & ratchet).
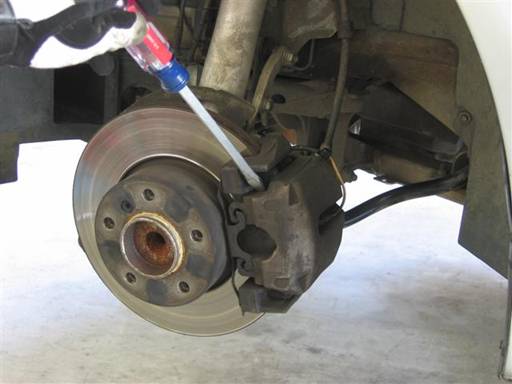
Remove caliper carrier from wheel carrier. Slightly pry caliper open at brake pad only as needed to facilitate removal (flathead).
Note: Do not over expand caliper as this will place possibly damaging pressure on system.
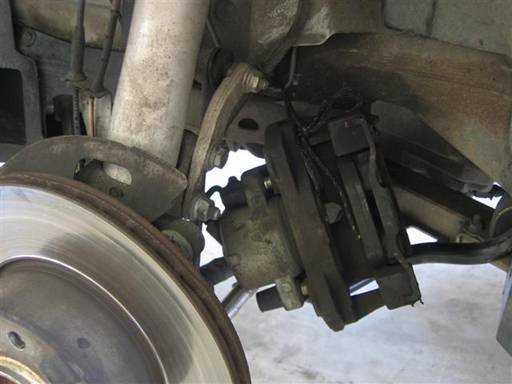
Tie caliper carrier onto brake fluid pipe (rope).
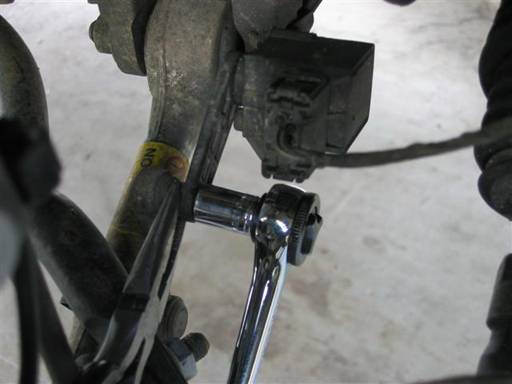
Right side: xenon lights: Disconnect level sensor regulating rod joint. Counter hold inside nut and remove outside nut (needle nose pliers, 10mm socket 1/4″ / 1/4″ ratchet). Remove bolt and rotate regulating rod (link) to be adjacent with control arm.
Check regulating rod ball joints as described below for stabilizer bar link.
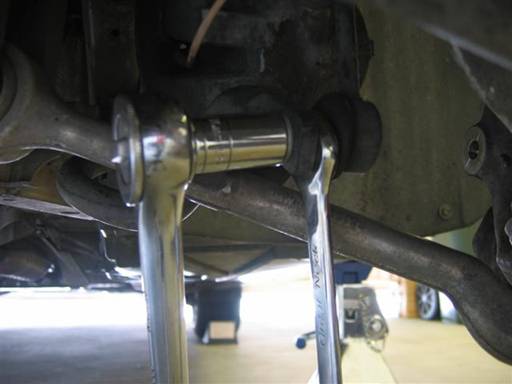
Disconnect stabilizer bar link joint at stabilizer bar. First, push aside ball joint boot from inside nut (flathead). Counter hold inside nut and remove outside nut (16mm combo wrench, 16mm socket 1/2″ / 1/2″ ratchet). If tool not fitting well on inside nut, then repeat boot removal attempt. Inside nut has only two flat facets, so outside nut might need to be turned to spin inside nut into a tool accessible orientation.
Remove stabilizer link bolt and rotate link to be adjacent with wheel carrier.
Note: Adjust stabilizer bar and link as needed to facilitate bolt removal.
This is a good opportunity to check the stabilizer bar link ball joints. Twist bolt / link on both ends to rotate ball / socket joints. Movement should be stiff. Push/pull each bolt (ball) in/out of link (socket) to look for play (free space). There should be no movement. Check link rubber boots for tears, especially at base seam.
Any ball joint play (free space) or rubber tear and link needs to be replaced (easy to perform at a later time).
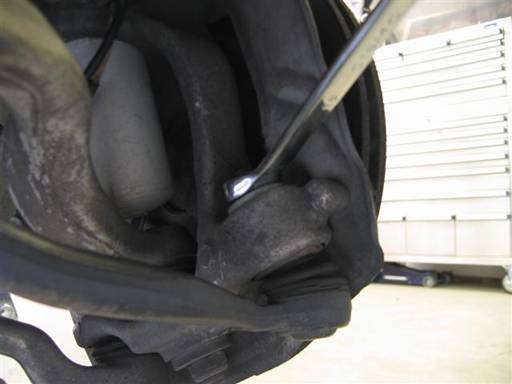
Remove steering outer tie-rod nut at wheel carrier (18mm combo wrench).
8-cyl note: Tie-rod attached at rear of wheel carrier shelf.
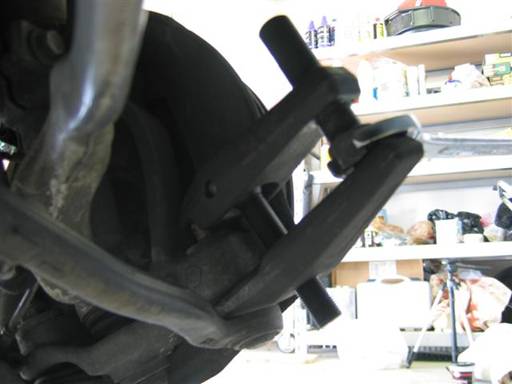
Remove tie-rod bolt from wheel carrier (BMW ball joint remover, 24mm combo wrench). Apply lubricant to outer/leverage spindle (graphite based grease). Screw in (clockwise) outer/leverage spindle, leaving ~1/2″ of thread. Adjust inner/fitting spindle to facilitate good fit between lower wheel carrier shelf and tie-rod bolt end. Insert/twist lower tool arm fork completely under tie-rod ball joint boot. Place upper tool arm press cup on top of tie-rod bolt end; Insert arm as far in as possible. Adjust fitting spindle as necessary. Tighten leverage spindle to hold tool in place (24mm combo wrench).
Tighten leverage spindle to press tie-rod bolt out of wheel carrier shelf (24mm combo wrench). There will be a “big bang” when bolt releases, and tools will drop to ground. Be careful!!
Note: It’s helpful to protect ears from shock (ear plugs).
8-cyl: Turn steering wheel to opposite side to facilitate space for tie-rod ball joint to drop out of wheel carrier.
Check tie-rod ball joint as described above for stabilizer bar link.
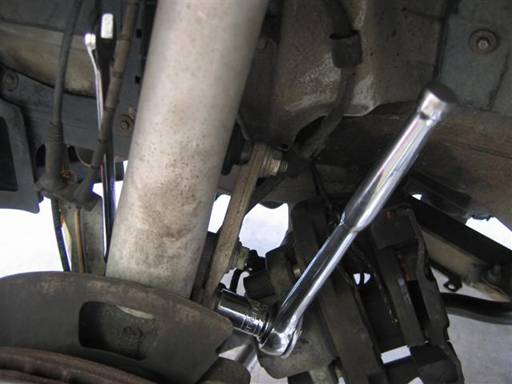
Disconnect wheel carrier strut bearing. Counter hold bolt and remove nut (16mm combo wrench, 18mm socket 1/2″ / 1/2″ ratchet). Remove bolt.
ABS/speed & brake pad sensor bracket will be removed.
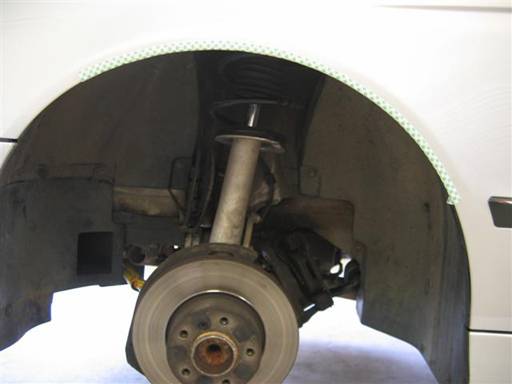
Protect fender middle to back rim. Cover rim inside, bottom lip, and outside (2″ mounting tape).
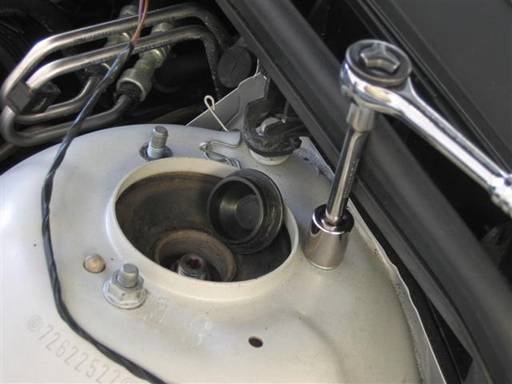
Remove strut plastic center cap (flathead) at strut tower (under hood).
Remove strut mount 3 nuts at strut tower (13mm socket 1/4″ / 1/4″ ratchet & socket extension).
Remove filter box spring clip at strut tower and partially lift filter box assy to allow easier removal of rear nut.
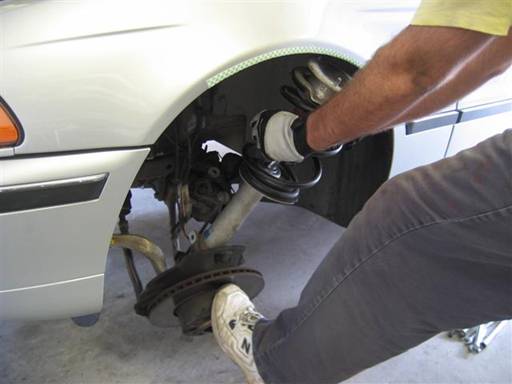
Optional: Insert bar into wheel hub center for foot leverage (long socket extension 1/2″).
Note: Verify ABS/speed and brake pad sensor cables have enough slack to allow for wheel carrier lowering in next steps.
Position tie-rod to side of wheel carrier.
Optional: Turn steering wheel, 6-cyl to opposite side, 8-cyl to work side, causing tie-rod to be drawn in to car inboard.
Press down on wheel hub with foot while holding onto spring coils with hands. Lower strut assy top out of strut tower and pull into outer wheel well.
Note: Allow strut assy top to lower strait out of tower first before pulling into outer wheel well. Otherwise strut assy will hook onto wheel well liner and become difficult to extract.
Press down again with foot, tilt strut assy top to rear ~10″, lower strut assy, and slowly lean strut assy top out of wheel well.
Note: Allow strut assy top to lower away from fender rim before pulling out of wheel well. Otherwise strut assy will hook onto fender inner rim and become difficult to extract.
Note: Do not use heavy force. If strut assy is not clearing rim, stop, and reconsider components positioning.
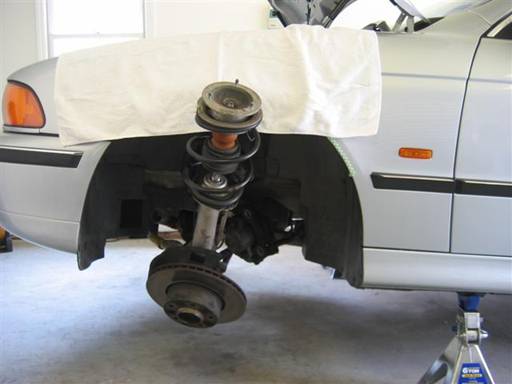
Cover fender to protect from strut assy (towel).
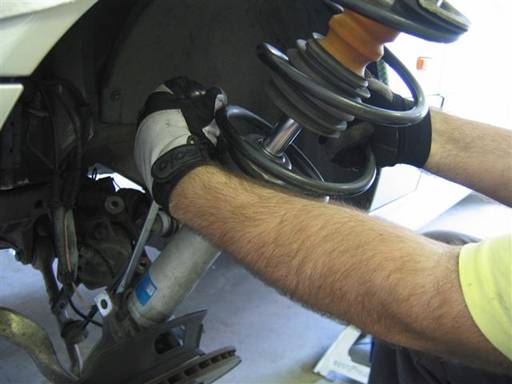
Remove strut from wheel carrier. Lubricate wheel carrier bearing top and bottom at strut (spray lubricant). Wait a few minutes for lubricant to take effect.
Pry open wheel carrier bearing (flathead), while simultaneously twisting spring coil and pulling up on strut.

Support wheel carrier to relieve pressure on suspension arms bushings.
Repeat procedure for second side.
Replacement of strut
Clean spring thoroughly (glass cleaner / towels). There should be no debris or grease on spring when done; clean and dry.
Coat both spring press spindle (bolt) threads with grease lubricant (graphite based grease). Also coat both spindle heads clasp contact surfaces.
Note: This is essential for proper function and maintenance of tool.
Clean spring press clasps (coil seats) (brake cleaner / towels).
Lay strut assy down horizontally (floor pad). Place a spring press at each side of spring, and alternate spring press directions so there is a spindle head at each spring seat.
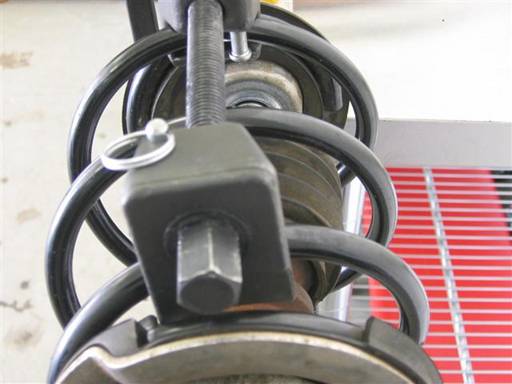
Working with spring press with spindle head at upper spring seat (strut mount seat), place spring press head clasp on coil as far to end of spring as possible. Jar spring press clasp a few times to push further to end on spring (dead blow hammer). Clasp should be just below spring end tip.
Place spring press tail clasp on spring two coils away, keeping spindle strait on strut axis.
Tighten spindle to maintain clasps positions.
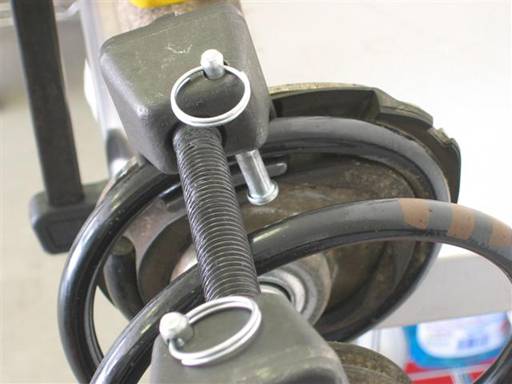
Perform same as above with second spring press. A notch in lower spring seat (strut perch) facilitates positioning spring press head clasp further to end of spring.
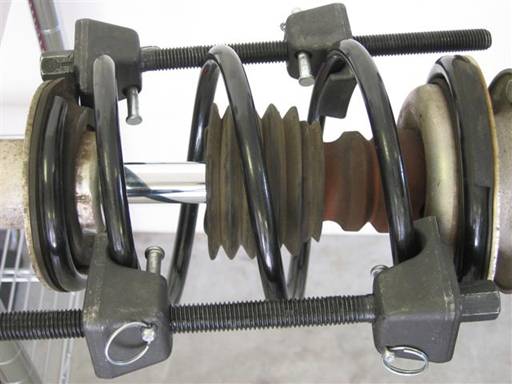
Spring presses need to be as far on opposite sides of spring as possible. This will help keep spring presses from slipping during press process.
It’s now important to take close note of the positioning of the spring in the strut assy. Understanding this will be essential for proper reassembly. The spring lower coil is molded to fit the lower seat (strut perch) egg shape and is positioned on the lower seat to fit that outline. The position of the spring lower tip is of no specific relevance. The strut mount is then positioned so that its notch indentation mates with the spring upper tip.
Optional: Place a mark on the spring lower coil at the perch nose tip to provide an orientation reference for reinstallation (paint).
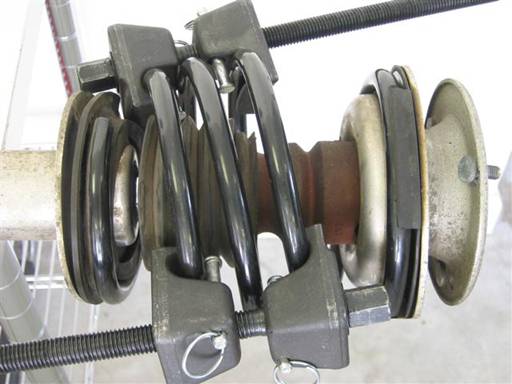
Note: It’s best to have strut horizontal when performing press process (floor pad).
Tighten spindles (3/4″ socket 1/2″ / 1/2″ ratchet), rotating often between spindles. Maintaining proportional spindle clasp to clasp lengths is essential to keeping a spring press from sliding. A spring press sliding out of position will cause significant complications. Rotate often and be careful not to jar spring presses.
Spring press with spindle head at upper spring seat will need open face tool on last 1/3 of press process due to spindle head proximity to seat (3/4″ combo wrench).
Spring coils need to be pressed until almost touching. Press process is complete when spring has some play between upper and lower seats.
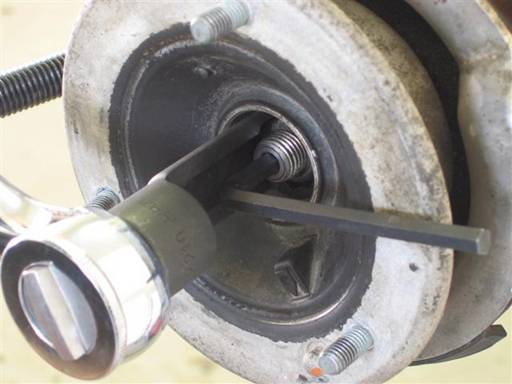
Counter hold strut piston rod and unscrew strut mount nut to break nut seize (6mm Allen wrench / pliers [to extend and leverage Allen wrench], BMW 21mm socket / 1/2″ ratchet).
Note: Above step needs effort and leverage. I performed this with strut standing on end (floor pad).
Counter hold strut piston rod and unscrew strut mount nut to remove nut (6mm Allen wrench / pliers, BMW 21mm socket / 1/2″ ratchet).
Note: Allen wrench will need to be repositioned 1/2 rotation for every 1/2 turn.
Dismantle strut assy.
Clean (brake cleaner (metal) | glass cleaner (rubber) / towels) reusable parts; strut mount, 2 washers, strut mount seat, end coils of spring.
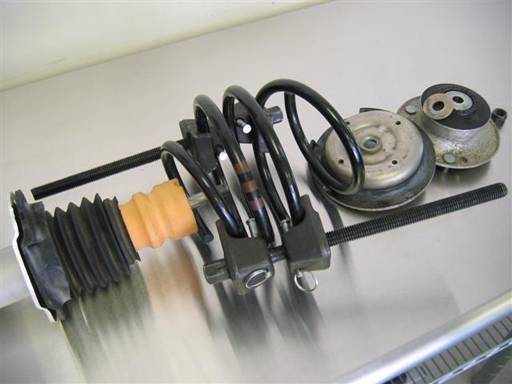
Note: Above picture shows exact positioning discussed below. Second assembled strut assy can also be referenced.
Place new spring pads on corresponding lower spring seat (new strut perch) and upper spring seat (strut mount seat), and position appropriately.
With new strut standing on end (floor pad), assemble strut assy.
Place rubber boot with wider end down onto strut piston rod.
Place bump stop with tapered end down onto strut piston rod. Insert bump stop into rubber boot and set into first accordion seat.” Press bump stop down onto strut piston rod until all rod threads are transparent.
Place spring with small coil end down onto lower spring seat. Rotate spring to perfectly fit seat outline.
Place upper spring seat onto spring end. Rotate seat so spring tip seats into its designated position/notch.
Double check all parts positioning, taking into account initial configuration observations.
Place spacer washer, convex side down, onto piston rod.
Place strut mount with dust washer onto piston rod; no specific orientation.
Place new strut mount self-locking nut onto piston rod and initially tighten (hand).
Counter hold strut piston rod and tighten strut mount nut (6mm Allen wrench /pliers, BMW 21mm socket / 1/2″ ratchet).
Note: Allen wrench will need to be repositioned 1/2 rotation for every 1/2 turn.
Fully tighten, 64 Nm (47 ft-lb) (6mm Allen wrench / pliers, BMW 21mm socket / 3/8″ torque wrench w/ 1/2″ converter).
Note: Above step needs effort and leverage. I performed this with strut standing on end (floor pad).
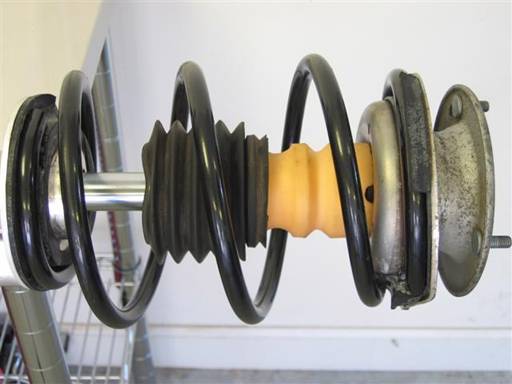
Note: It’s important to have strut standing on end when initially uncompressing spring presses to insure proper positioning of components (floor pad).
Unscrew spring presses, rotating often between spindles (3/4″ socket 1/2″ / 1/2″ ratchet | 3/4″ combo wrench). Maintaining proportional spindle clasp to clasp lengths is essential to keeping a spring press from sliding. Be careful not to jar spring presses.
Watch component positioning and adjust as needed (dead blow hammer).
Once spring has seated well, it’s best to complete uncompressing process while strut is horizontal (floor pad). Rotate often and be careful not to jar spring presses. Watch component positioning and adjust as needed (dead blow hammer).
Once spring has fully seated and spring presses are loose, remove spring presses.
Repeat procedure for second side.
Installation of spring/strut on car
Clean (brake cleaner / towels, wire brush) following parts:
- Wheel carrier strut bearing shaft and bolt/nut contact surfaces, mounting bolt; ABS/speed & brake pad sensor holding bracket contact surfaces.
- Strut tower bolt/nut contact surfaces.
- Tie-rod bolt and washer, and wheel carrier contact surfaces.
- Stabilizer link bolt and stabilizer bar contact surfaces.
- Right side: xenon lights: bolt and nut, and regulating rod contact surfaces.
- Caliper carrier and wheel carrier contact surfaces and mounting bolts.
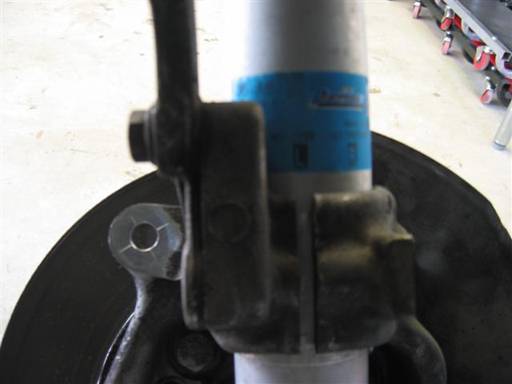
Fully insert strut, with alignment tag facing car inboard side, into wheel carrier bearing. A strut shelf will define insertion end point. Adjust strut to align L or R tag indication, respectively for left or right side, with bearing seam.
Insert strut assy top into wheel well. Position tie-rod to side of wheel carrier.
Press down on wheel hub with foot while holding onto spring coils with hands.
Tilt strut assy top to rear, ~10″, and slowly lean strut assy top into wheel well.
Note: Do not use heavy force. If strut assy is not clearing rim, stop, and reconsider arms positioning at wheel carrier.
Press down again with foot, and push strut assy top into strut tower (hands).
Place one hand in wheel well and push up on a spring coil. Rotate strut mount from top (under hood) with second hand to align properly; reference key peg. Insert bolts into their respective strut tower holes and screw on new self-locking nuts (hand). Fully tighten, 24 Nm (17.5 ft-lb) (13mm socket 1/4″ / 1/4″ ratchet & socket extension).
Partially lift filter box assy to allow easier installation of rear nut.
Reinstall filter box spring clip at strut tower.
Reinstall strut center plastic cap.
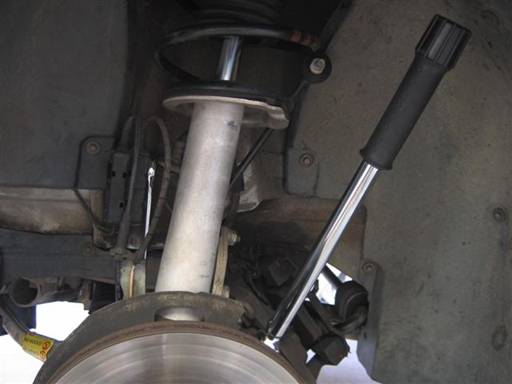
Place ABS/speed and brake pad sensor bracket at wheel carrier mounting position.
Left side: When oriented properly, wires will show from car outboard side.
Right side: When oriented properly, wires will show from car inboard side.
Insert wheel carrier bearing mounting bolt from front end of wheel carrier. Screw bolt in as needed to fully insert. Screw on new self-locking nut. Counter hold bolt and tighten nut (16mm combo wrench, 18mm socket 1/2″ / 1/2″ ratchet). Fully tighten, 81 Nm (59 ft-lb) (16mm combo wrench, 18mm socket 1/2″ / 3/8″ torque wrench & 1/2″ converter).
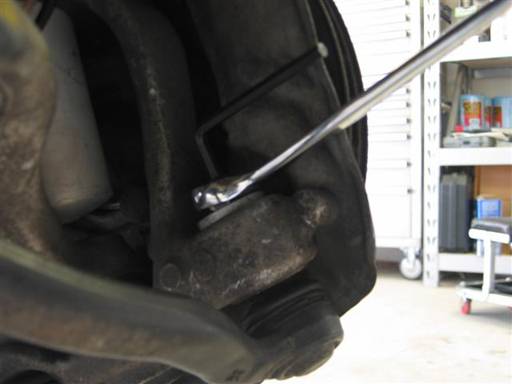
Insert outer tie-rod bolt into wheel carrier mounting hole. Place washer on bolt and screw on new self-locking nut (hand). Counter hold bolt end and tighten self-locking nut (5mm Allen wrench , 18mm combo wrench). Fully tighten, 65 Nm (48 ft-lb) (18mm combo wrench).
Note: Torque tool access not feasible; tighten by feel (hard).
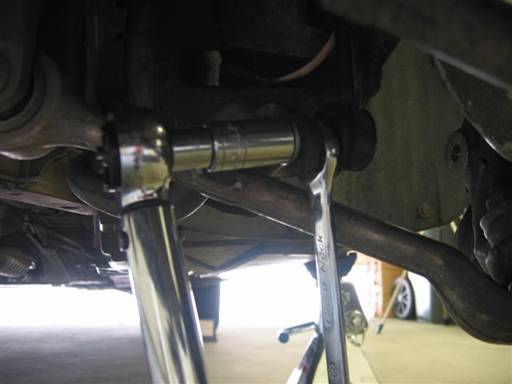
Insert stabilizer bar link bolt into stabilizer bar mounting hole. Adjust stabilizer bar and link to facilitate bolt insertion. Screw on new self-locking nut. Counter hold inside nut and tighten outside nut (16mm combo wrench, 16mm socket 1/2″ / 1/2″ ratchet). Fully tighten, 65 Nm (48 ft-lb) (16mm combo wrench, 16mm socket 1/2″ / 3/8″ torque wrench & 1/2″ converter).
Right side: xenon lights: Insert level sensor regulating rod bolt into level sensor mounting hole. Screw on self-locking nut. Counter hold inside nut and tighten outside nut (needle nose pliers, 10mm socket 1/4″ / 1/4″ ratchet).
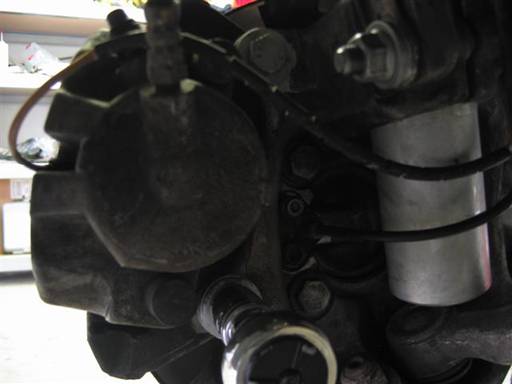
Untie brake caliper carrier. Install caliper carrier on wheel carrier with mounting bolts. Fully tighten bolts, 110 Nm (81 Ft-lb) (18mm socket 1/2″ / 3/8″ torque wrench & 1/2″ converter).
Repeat procedure for second side.
Reinstall engine splashguard. Reinstall front wheels. Lower front of car (follow appropriate procedure).
Start car and pump brake pedal several times to tighten brake caliper pitons.
This is very important!!
A wheel alignment should be performed after the repair.
To my mom, may she always be blessed.
Rajaie (Palestinian)
© 2024 Beisan Systems LLC

